Use ChatGPT & Integrate Three JS 3D Animation in Your WordPress Site!
Table of Contents:
I. Introduction
II. Preparing Your Three.js Animation
III. Convert Front-end Code to HTML and CSS
IV. Combine JS Files and Convert to Class-based
V. Adding Animation Code to WordPress
VI. Conclusion
VII. FAQs
Introduction
Are you ready to bring your WordPress site to life with a captivating Three.js 3D animation? Look no further! With the help of ChatGPT, an AI-powered language model, you can seamlessly integrate your custom Three.js animation into your WordPress site in just 20 minutes. In this comprehensive guide, we will take you through each step of the process, while also explaining the reasoning behind each decision. By the end, you will not only have a stunning 3D animation on your WordPress homepage but also a deeper understanding of the process.
Step 1: Preparing Your Three.js Animation
Before diving into the integration process, it’s essential to gather the code files for your Three.js 3D animation. Whether you developed it using React, Angular, or any other front-end framework, make sure to provide ChatGPT with the relevant code snippets to understand the structure and functionality of your animation.
Providing ChatGPT with the code files allows it to analyze the animation’s code structure and provide guidance tailored to your specific implementation.
Example code snippet:
// Example Three.js Animation Code
// File: animation.js

// Animation setup and initialization
const renderer = new THREE.WebGLRenderer();
const scene = new THREE.Scene();
const camera = new THREE.PerspectiveCamera(75, window.innerWidth / window.innerHeight, 0.1, 1000);

// ... Rest of the animation code ...
Example prompt for ChatGPT:
I have a Three.js 3D animation built in React. Can you please help me understand the code structure and functionality of the animation for WordPress integration?
Step 2: Convert Front-end Code to HTML and CSS
To seamlessly integrate your animation into WordPress, provide ChatGPT with the front-end code snippets, regardless of the language or framework used. Specify the type of code you’re providing, such as PUG, SCSS, or any other language, to ensure accurate conversion to HTML and CSS optimized for WordPress.
WordPress primarily uses HTML and CSS for custom code integration. Converting the front-end code to HTML and CSS ensures compatibility and smooth integration within the WordPress environment.
Example code snippet (PUG):
// Example PUG Code
// File: animation.pug

div.animation-container
  canvas#animation-canvas
I have the animation code in PUG and SCSS. Can you please convert the PUG code into HTML and the SCSS code into CSS for WordPress integration?
Step 3: Combine JS Files and Convert to Class-based
You might have multiple JS files that are required for running your Three.js 3D animation smoothly. To improve organization and maintainability, provide ChatGPT with all the separate JavaScript files of your animation. Ask ChatGPT to combine them into a single code file and convert it into a class-based JavaScript structure.
Combining the separate JavaScript files into a single file simplifies the integration process. Converting it into a class-based structure enhances reusability and efficiency when working with WordPress.
Example code snippet:
// Combined and Class-based JS Code
// File: animation.js

class Animation {
  constructor() {
    this.renderer = new THREE.WebGLRenderer();
    this.scene = new THREE.Scene();
    this.camera = new THREE.PerspectiveCamera(75, window.innerWidth / window.innerHeight, 0.1, 1000);

    // ... Rest of the animation code ...
  }

  start() {
    // Animation start logic
    this.renderer.setSize(window.innerWidth, window.innerHeight);
    document.body.appendChild(this.renderer.domElement);

    // ... Rest of the animation code ...
  }

  // ... Class methods for animation functionality ...
}
Example prompt for ChatGPT:
I have multiple separate JS files for my animation. Can you combine them into a single file and convert it into a class-based structure for WordPress integration?
Step 4: Adding Animation Code to WordPress
Now comes the exciting part—integrating your Three.js animation into your WordPress site! To achieve this, you’ll need to follow these steps :
Open the homepage editor: Go to your WordPress dashboard and navigate to the page editor for your homepage.
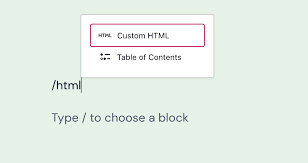
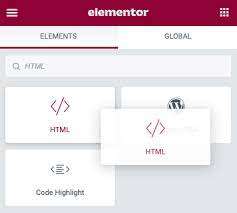
Add an HTML block: In the editor, add an HTML block to the desired location where you want the animation to appear on the homepage. Depending upon the editor you are using your HTML block might look like any of these:
3. Copy and paste CSS code: Inside the HTML block, start by adding a <style> tag to encapsulate the CSS code. Copy the CSS code generated by ChatGPT and paste it between the opening and closing <style> tags. This ensures that the styles defined for the animation are applied properly.
Example code snippet:
<!-- HTML block in WordPress -->
<style>
/* CSS code generated by ChatGPT */
.my-animation {
  /* Animation styles */
}
</style>
Insert HTML code: Below the closing </style> tag, paste the full HTML code generated by ChatGPT. This HTML code represents the elements and structure of the animation.
Example code snippet:
<!-- HTML block in WordPress -->
<style>
/* CSS code generated by ChatGPT */
.my-animation {
  /* Animation styles */
}
</style>

<!-- HTML code generated by ChatGPT -->
<div class="my-animation">
  <!-- Animation elements -->
</div>
Add JavaScript code to header.php: To add the custom JavaScript code for the animation, you have two options: using a third-party plugin or directly adding the code to the header.php file. Placing the JavaScript code in the header.php file allows you to have better control and flexibility over the animation. The use of a <script> tag with type="module" ensures that the code is executed as a module, allowing you to use import statements and organize your code more efficiently.
In this case, we’ll choose the second option for better control and flexibility.
a. Locate the header.php file: Access your website’s file manager from cPanel or use an FTP client to navigate to public_html/wp-content/themes/{your-theme-name}/header.php.
b. Edit the header.php file: Open the header.php file in a text editor and scroll to the section where the <body> tag is defined. This is usually indicated by the <body <?php body_class(); ?>> line.
c. Insert the JavaScript code: After the <body <?php body_class(); ?>> line, add a new <script> tag. Inside the script tag, import the Three.js library using a CDN and then include your custom JavaScript code.
Example code snippet (header.php):
<!-- header.php file -->
<body <?php body_class(); ?>>
  <!-- Your WordPress theme code -->

  <!-- Import Three.js library -->
  <script type="module" src="https://cdn.skypack.dev/three@0.152.2"></script>

  <!-- Custom JavaScript code -->
  <script type="module">
    // Import the THREE module
    import * as THREE from 'https://cdn.skypack.dev/three@0.152.2';

    // Initiate the Animation class and start the animation
    const animation = new Animation();
    animation.start();
  </script>

  <!-- Rest of the header.php file -->
</body>
Conditionally execute the animation code: To ensure that the animation runs only on the homepage or your desired page, you can add a conditional statement within the script tag. Wrap your custom JavaScript code with a PHP condition that checks if the current page is the homepage using the is_front_page() function, or your desired page using the is_page("your-page-slug") function.
Example code snippet (header.php):
<!-- header.php file -->
<body <?php body_class(); ?>>
  <!-- Your WordPress theme code -->

  // Check if the page is the homepage
    <?php if ( is_front_page() ) { ?>

  <!-- Import Three.js library -->
  <script type="module" src="https://cdn.skypack.dev/three@0.152.2"></script>

  <!-- Custom JavaScript code -->
  <script type="module">
    // Import the THREE module
    import * as THREE from 'https://cdn.skypack.dev/three@0.152.2';

    // Initiate the Animation class and start the animation
    const animation = new Animation();
    animation.start();

  </script>
   <?php } ?>

  <!-- Rest of the header.php file -->
</body>
Save and clear cache: After adding the JavaScript code to the header.php file, save the changes and clear any caching mechanisms in place. This ensures that the updated code is loaded and the animation is displayed properly on the homepage.
Conclusion
Congratulations! You have successfully integrated a captivating Three.js 3D animation into your WordPress site using ChatGPT. Throughout the process, you learned how to prepare your animation code, convert front-end code to HTML and CSS, organize JavaScript code, and add it to WordPress with conditional execution. By leveraging ChatGPT’s guidance, you’ve not only enhanced your website’s visual appeal but also gained valuable insights into front-end development and WordPress customization. Remember, the possibilities for creativity and customization are endless with ChatGPT as your trusted companion. We at Devs Core regularly use such AI tools to maintain, monitor and fast code projects of our clients around the world. Happy coding and keep exploring the fascinating world of web development with AI!
We use cookies on our website to give you the most relevant experience by remembering your preferences and repeat visits. By clicking “Accept”, you consent to the use of ALL the cookies.
This website uses cookies to improve your experience while you navigate through the website. Out of these, the cookies that are categorized as necessary are stored on your browser as they are essential for the working of basic functionalities of the website. We also use third-party cookies that help us analyze and understand how you use this website. These cookies will be stored in your browser only with your consent. You also have the option to opt-out of these cookies. But opting out of some of these cookies may affect your browsing experience.
Necessary cookies are absolutely essential for the website to function properly. These cookies ensure basic functionalities and security features of the website, anonymously.
Cookie
Duration
Description
cookielawinfo-checkbox-analytics
11 months
This cookie is set by GDPR Cookie Consent plugin. The cookie is used to store the user consent for the cookies in the category "Analytics".
cookielawinfo-checkbox-functional
11 months
The cookie is set by GDPR cookie consent to record the user consent for the cookies in the category "Functional".
cookielawinfo-checkbox-necessary
11 months
This cookie is set by GDPR Cookie Consent plugin. The cookies is used to store the user consent for the cookies in the category "Necessary".
cookielawinfo-checkbox-others
11 months
This cookie is set by GDPR Cookie Consent plugin. The cookie is used to store the user consent for the cookies in the category "Other.
cookielawinfo-checkbox-performance
11 months
This cookie is set by GDPR Cookie Consent plugin. The cookie is used to store the user consent for the cookies in the category "Performance".
viewed_cookie_policy
11 months
The cookie is set by the GDPR Cookie Consent plugin and is used to store whether or not user has consented to the use of cookies. It does not store any personal data.
Functional cookies help to perform certain functionalities like sharing the content of the website on social media platforms, collect feedbacks, and other third-party features.
Performance cookies are used to understand and analyze the key performance indexes of the website which helps in delivering a better user experience for the visitors.
Analytical cookies are used to understand how visitors interact with the website. These cookies help provide information on metrics the number of visitors, bounce rate, traffic source, etc.
Advertisement cookies are used to provide visitors with relevant ads and marketing campaigns. These cookies track visitors across websites and collect information to provide customized ads.